Tuesday, 4 December 2012

Digital Project #4


The high contrast is really eye catching in this photo. The energy shown through the jump, facial expression and the choice clothes really shows the message of a "Self-Portrait".


I really like the lighting used here. With the light source put behind the subject, this makes the subject more defined in the image. The beer bottles laying around give a background story to the photo.

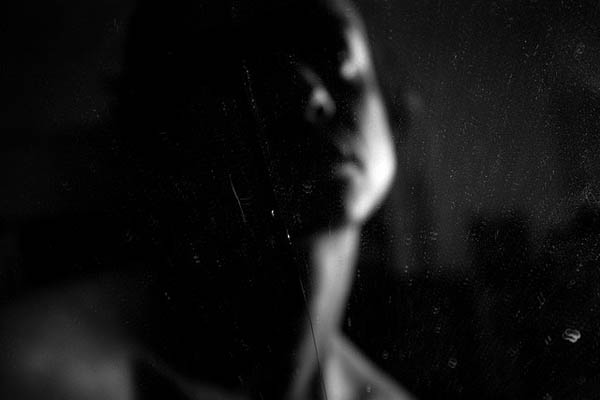
I like the one sided lighting used here, mixed with the slow shutter speed and the blurriness. This gives an ominous effect to the image, while still retaining the person and keeping the portrait factor still prominent.


I used the slow shutter to capture motion by creating motion blur. This photo was inspired by the 3rd photo posted in the set above. 

This photo was inspired by the second photo in the set above. I used lighting set behind myself to give an outline to my body as well as giving details to other objects in the photo. The skateboard is there to represent my love for skateboarding. 

Wednesday, 7 November 2012

Retouch a Model Portrait in Photoshop


  • Take a portrait photo and bring the photo into Photoshop
  • Mask out the subject using the Lasso Tool (L) *the Magnetic Lasso tool may be easier to use.
  • After the subject has been masked out, right click and click on the Refine Edge option
  • This will bring up a window with "Radius" "Contrast" "Smooth" "Feather and "Contract/Expand" adjustment bars. Just adjust those until the subject is outlined well.
  • Click ok, and it will bring you back to the image with a selected area. Right click and click the Layer via copy option, so you can compare after wards.
Now that you have your subject on its own, you can make adjustments.
*Use Add New Layer Adjustment, just in case you need to make adjustments later.
  • Start with the levels adjustment, followed by curves, colour balance and saturation. 
  • After, adjustments have been made, use the Spot Healing Tool (J) or the Clone Stamp Tool (S) to fix any blemishes and smooth out skin.
  • The Smudge Tool (R) could be used to raise eyebrows, make smiles more prominent, etc.
  • Then add "make up" by adding a new layer and using the brush tool, making sure the hardness is down to 0%. Highlight the cheekbones, even out the skin, whiten teeth and make eyes brighter with this. After all "make up" has been applied, lower the opacity of the layer to make it subtle but significant.
After all adjustments have been applied to the subject, add a background
  • Add a background to the image by adding a new layer and dragging it behind the subject layer.
  • You can use an image, flat colour or gradient as a background.
  • I wanted to go for the studio look, so I used a Radial Gradient (G) and reversed the colours, so that the white is in the middle and we're left with minimal vignetting.

Tuesday, 23 October 2012

Tilt-Shift Photography


Tilt-Shift 1


 Tilt-Shift 2

Tilt-Shift 3


Response

Tilt-shift is the style of photography that blurs certain factors of the photo while keeping the subject in focus, this gives the illusion of a "miniature world". Professionally, tilt-shift photography is done with tilt-shift lenses, but here we gave the tilt-shift effect in post-production.

In class we took the photos at a higher angle giving the effect of being above the whole scene. Then, we took the photos into Photoshop and Processed it there. In Photoshop we did the following
  • Imported the photo into the program
  • Unlocked the layer that the photo is in
  • Adjust the Levels of the photo so that the colours and exposure gives a more toy/fake look
  • Enter the Quick Mask Mode (Shift+Q)
  • Use the Gradient tool (G) - Make sure you're using a reflected gradient
  • Click and drag to make a mask of what you don't want blurred out
  • Exit Quick Mask Mode (Shift+Q)
  • Under the Filter tab (found in the top Menu Bar), find Blur and choose a blur effect
  • Adjust it the effect so that it gives a realistic blur and then apply it by hitting "OK"